Moodle LTI 1.3 (Advantage) — Provider Setup Guide
Tested with Moodle 5.1 Publish as LTI tool — adapt names to your Moodle language pack if needed.
Overview
LTI 1.3 relies on OpenID Connect + OAuth 2.0 with signed JWTs and JWKS key discovery. Moodle acts as the Tool and lets an external Platform launch courses or activities, optionally exchanging grades via AGS (Assignment & Grade Service) and rosters via NRPS (Names & Roles Provisioning Service).
Before you start
- You need Moodle site administrator access.
- Confirm the LTI authentication plugin and Publish as LTI tool enrolment plugin are available (Moodle 4.1+).
- Gather the Platform contact so you can exchange URLs and keys if manual registration is required.
Step 1 – Enable Moodle’s LTI provider plugins
- Go to Site administration → Plugins → Authentication → Manage authentication and enable LTI.
- Go to Site administration → Plugins → Enrolments → Manage enrol plugins and enable Publish as LTI tool.
- Confirm cron runs regularly; grade return and roster sync depend on it.
Step 2 – Register Moodle with the Platform
In Moodle (Tool):
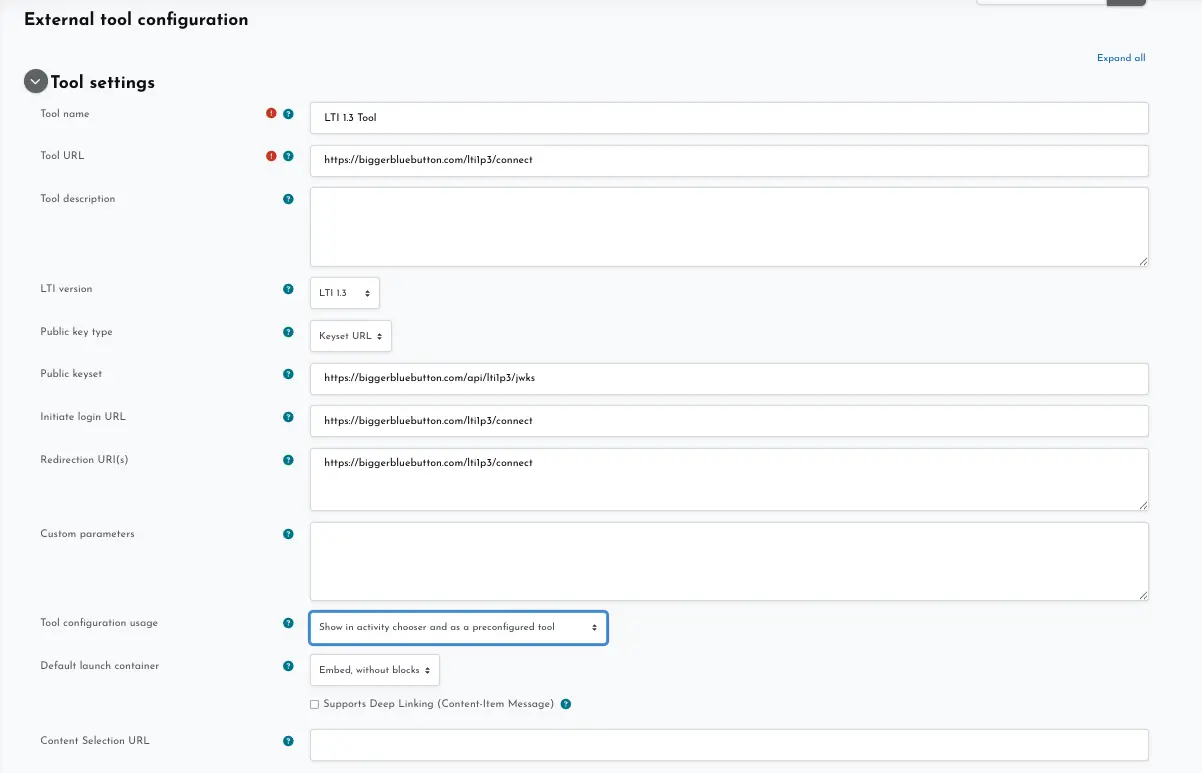
- Go to Site administration → Plugins → Activity modules → External tool → Manage tools.
- Choose Configure a tool manually and fill in the Tool name, description, and (optionally) a logo. Moodle will expose the following values:
- OpenID Connect authentication request URL
- JWKS URL (public keys)
- Access token URL (OAuth 2.0)
- Deep linking request URL (if enabled)
In the Platform (Client):
- Create a new LTI 1.3 tool/app and set LTI version to 1.3.
- Paste the Moodle URLs from the previous step. Choose JWKS URL as the key type so the Platform fetches keys automatically.
- Record the Client ID, Issuer (iss), Deployment ID, and (if provided) a Deep Linking return URL
After you save the configuration, Moodle displays the registration with status Active and lists the Platform deployment details.

Open Dashboard → BigBlueButton LTI (or your tool’s dashboard) to verify that launch URLs and keys match what the Platform expects.

Step 3 – Share courses or activities
Once registration is active you can expose Moodle content to the Platform:
- Navigate to the course you want to publish and choose More → LTI tools.
- Select Publish course to share the entire course, or Publish activity to expose specific modules.
- Set the Access control (e.g., enrolment key, open access, or cohort restrictions) and choose whether to return grades via AGS.
Grades and roster updates are sent to the Platform whenever cron runs, provided AGS/NRPS were enabled during registration.
Step 4 – Configure the Platform launch experience
- Deep Linking: Allow instructors to open the tool picker so they can browse Moodle activities and place resource links directly in the Platform course shell.
- Manual Links: If deep linking is not available, create static launch links using the deployment ID and resource link details provided by Moodle.
- Role mapping: Ensure the Platform maps local roles (e.g., Instructor, Learner) to the IMS role vocabulary expected by Moodle.
Step 5 – Test an end-to-end launch
- From the Platform course, launch the LTI link as an instructor to create the deployment.
- Launch as a learner and confirm the activity opens in Moodle and enrols the user.
- Complete an activity and check that grades flow back to the Platform.
Troubleshooting & tips
- Inspect the id_token payload for
iss,client_id,deployment_id,resource_link_id, and role claims when debugging launches. - Cache Moodle’s JWKS keys with a sensible TTL and honour key rotation events.
- Serve all endpoints over HTTPS with a publicly trusted certificate.
- Avoid legacy consumer key/secret—they apply only to LTI 1.1 implementations.